Monday, April 27, 2009

External Displays on the OSX Dell Mini 9

I'm on the second week of  using my OSX Mini 9 as my main work computer (work being email, writing, presentations, IRC, browsing, and some light application dev work) and so far the experience has been great, especially while traveling in NYC last week.  I'm prepping PowerPoints for presentations this week, so I tried using an external monitor to see them on a larger screen.  Using an external monitor or projector turns out to be a little more complicated than on a typical Mac; although my success connecting the MacBook Pro's DVI to SVGA dongle to projectors has been less than stellar in the past.
I plugged my external monitor into the SVGA port and the screen immediately turned to gobbledygook.  It turns out that mirroring is turned on automatically by default in the Display Preferences.  Apparently the kext loaded by DellEFI1.1 is not display mirroring friendly. Fortunately, this is a solved problem and you can download  the mirrorTool utility to turn off mirroring.  The tool comes as an app or as a command line utility.  First unplug the external monitor to restore the Mini's screen.  Using the command line tool was simple:
./mirror -off
Once mirroring is off, you should see part of the desktop on the external monitor and the menu bar and dock in your mini screen.  From my viewpoint this is backward and I want both the menu bar and dock on the larger screen.  When I tried viewing a slideshow using NeoOffice Impress, the Mini screen displayed the slides and the external monitor displayed the presenter preview;  obviously this wasn't working out as expected.  To switch these around, open System Preferences > Displays  find the window with the external monitor and click on Arrangements.
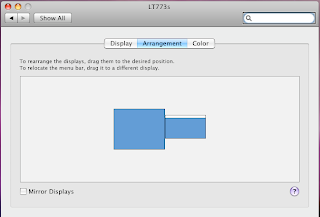
You can drag the menu bar to the external monitor and I dragged the Mini screen to the right of the external monitor.
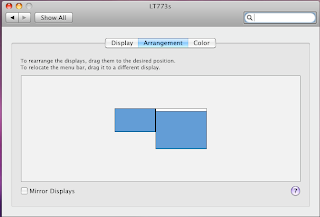
The menu bar and dock are now where I expect them to be.  Moving the menu bar is key to getting Impress to display a slideshow correctly.  Your preferences are saved, so when you unplug from the external monitor, the Mini reverts to its previous state.
Finally, adding a USB keyboard and a bluetooth mouse to the equation finishes things up quite nicely. 

Thursday, April 16, 2009

HowTo: Install OSX on a Dell Mini 9 with an external DVD

Yes, I know that there a gazillion guides on how to install OS X on a Dell Inspiron Mini 9, but for some reason they were all just a little bit off or outdated or just really complicated and hard to follow.  This guide was the most comprehensive, but not the easiest to follow.
This guide is for installing OS X 10.5.6 on a Dell Inspiron 9 with an external DVD drive, no USB drives needed.
Things you need:
  • Dell Mini 9 with at least 16GB SSD drive
  • External DVD with USB interface 
  • OS X 10.5.6 Retail version
  • DellMiniBoot v8.02b1 iso
Installation:
  1. Download the the DellMiniBoot iso and burn it to a bootable CD.
  2. Connect the external DVD to the Dell Mini and turn on the Mini.  Press "0" to enable the boot menu, choose CD/DVD to boot to the DVD drive.
  3. The system will load a linux kernel and return with a prompt that says "boot:"   At this point, remove the boot disk and put the OS X disk in the DVD drive.
  4. Press ESC to bring up the drive options, type in "9f" then enter to select the dvd drive.  At this point, my install returned an "ebios read error".  This means that drive is having problems reading the disk.  The solution is to turn of the external drive and turn it on again while the Mini is still running.  Plugging and unplugging the USB cable is also supposed to work.  There will be a couple more "ebios read errors" then the drive should catch and start to load the OS X installer.
  5. The installer will ask to partition and reformat your SSD drive, it should do this automatically.  However, in my case I installed a third party 32gb Runcore SSD* so I had to  manually partition the disk using the disk utility that comes with the installer.  I partitioned the drive as a Mac OS Extended (journaled), pressed "Options..." selected GUID and pressed "Apply".  I then returned to the install, which took about 45 minutes.
  6. When OS X is installed and running, replace the OS X disk with the DellMiniBoot cd.  Open the CD in Finder and open the DellMini9Utils directory.  Click on the DellEFI app, this will install the boot loader and other extensions such as the WiFi driver.
  7. In the same directory, click on the AboutThisMac.pkg package to update the system information.
  8. Restart the Mini 9, and it should boot to OS X with wifi, sound, bluetooth and the other goodies enabled.
  9. Other things I did was upgrade the system memory  from 512mb to 1gb, added a 16gb SDHC for extra storage, added a bluetooth dongle I had lying around.
  10. Enjoy typing on a ridiculously small keyboard!
* I installed a Runcore SSD because it currently has the fastest read/write speeds for a MLC (Multi-Level Cell)  SSD card.  My brother-in-law installed a Crucial SSD and the system was unusably slow.  I ordered my SSD from MyDigitalDiscount and it took over a month for them to ship the SSD because demand is far outstripping supply.  That being said, it was definitely worth the wait because the OS X boot time about 15-20 seconds and everything runs quite quickly.
So totaling up the costs (including shipping and taxes):
$170.00  Dell Inspiron Mini 9 (refurbished)   $124.00  Runcore 32gb SSD                                $137.00  OS X 10.5.6 Retail                                 $ 30.00   16gb SDHC                                             
----------
$461.00
A bit more than the often touted $300 netbook, but I'm willing to pay the extra premium for an OS that enhances my productivity.

Wednesday, April 15, 2009

Maps for Advocacy

From the WhereIdeas Wiki:
Tactical Technology Collective has put together a great book Maps for Advocacy: An Introduction to Geographical Mapping Techniques (http://www.tacticaltech.org/mapsforadvocacy). Use of maps in the political and activism space is growing and very successful. —GregElin, Sunlight Foundation.
Summary blurb from the Tactical Technology Collective website:
"The booklet is an effective guide to using maps in advocacy. The mapping process for advocacy is explained vividly through case studies, descriptions of procedures and methods, a review of data sources as well as a glossary of mapping terminology. Scattered through the booklet are links to websites which afford a glance at a few prolific mapping efforts. "
Indeed, in 44 pages the booklet provides coverage of the majority of the web based mapping technologies available today that don't require purchasing a license.  One of the best parts of the book is the roadmap to the technologies based upon what a user wants to do. 
If you provide a service or software, where do you think your technology fits?

Tuesday, April 7, 2009

Communities

A question about directional arrows came up on the udig developers list:
"How to style line features with an arrowhead at either end? Preferably using SLD, other methods are welcome if SLD does not support that. I found this thread on the subject: http://www.nabble.com/Directional-Symbology-td12231197.html ...but it does fully answer the question. Given a line feature type with a LineSymbolizer, if I define an additional PointSymbolizer for that type, where do the point symbols get placed? At the first vertex, the last, somewhere in the middle of the line? Do I have to create an additional point feature just to position the arrow icon on a line feature?"
So I pointed him to a geoserver blog post on that very topic and the poster was able to implement a solution quickly.
Communities are awesome.  How's that for tech support?