I install and uninstall different versions of Postgres/PostGIS as needed. EnterpriseDB provides pre-built binary installers that save you from the headache of installing all the bits and pieces needed for PostGIS. A small annoyance is that the uninstall-postgresql app is hidden in /Library/PostgresSQL/(version) directory. Dragging the PostgreSQL folder into the trash does not completely uninstall it as with other OSX applications.
I had problems installing PostGIS using the EnterpriseDB StackBuilder after an uninstall. It would go through the process but it would not create the postgis template. The components were installed in /Library/PostgresSQL/(version) but I had to create the postgis template manually. In addition, PGAdmin III would list the postgres instances that I had previously uninstalled.
After a bit of hunting around with ls and grep, I found /private/etc/postgres-reg.ini which contains definitions of the installed and uninstalled databases. Why there is an ini file in an OSX installation is beyond me, but deleting this file ensures a clean install of the EnterpiseDB binary installers.
Showing posts with label OS X. Show all posts
Showing posts with label OS X. Show all posts
Saturday, December 12, 2009
Saturday, October 10, 2009
Update on Dell Mini with OSX
It's been six months, so I thought I would do a quick update on my Dell Mini.
What works
What doesn't work
I've use the Dell Mini as my primary machine for six months under heavy use. My 15" MacBook Pro is used mostly for running other operating systems and watching movies. Given that the MBP is 6 times more expensive than the Mini in its current configuration, leads me to question the conventional wisdom about buying the most hardware you can afford. I think that this goes to show the OSX performs quite well with modest hardware.
So far, the advantages of portability outweigh the Mini's shortcomings. However, that hasn't stopped me from eyeing the 13" MacBook Pros, which would do everything I need, just not in such a small package.
What works
- It's small and light weight: I travel frequently and its nice to be able to stick a notebook in my purse/backpack/grocery bag. In contrast, my MacBook Pro (the old 15 inch model) weighs around 7-8 lbs with the power supply and requires a laptop bag.
- It's powerful enough: I typically have 10 -15 apps running at the same time. This includes MS Office, Eclipse, Apache, Postgres, a couple of browsers, Thunderbird, Colloquy, Tweetie, Evernote, Python stuff, java web apps, text editors - the list goes on. If things go pear shaped, it's usually a browser hogging all the memory. I recently built the GeoTools library and I think the Dell Mini did it in under 20 minutes. I would have never believed that I could do my typical workflow with a 1.6 GHz processor with 2 GB of RAM.
- 32 GB of disk is sufficient: I thought that 32gb would be cramped, but I have yet to run out of disk space. I don't think I've dipped below 5gb of free disk space, but I do cheat a little and use the 16gb SDHC card for storing big files.
- Wireless works everywhere: With my MacBook Pro, I have dead spots in my house. This is understandable because my house is old with brick walls and with non-load bearing walls covered with plaster over a wire mesh. I don't have this problem with the Mini, I get WiFi in every part of the house.
- Decent battery life: I can easily squeeze out 3 hours of work using the standard battery on a flight between San Antonio and DC, which is a 3.5 hour direct flight.
- SD card: Being able to copy photos from the SD card on my camera to Flickr or just on to my drive is teh awesome. No additional cables needed.
- Fast boot: So I have to hard boot on occasion, especially if sleep decides to throw a tantrum. At least I don't have to wait very long, usually under 20 seconds.
What doesn't work
- Form factor: Its friggin small, so I use a USB keyboard, a wireless mouse and an external monitor to be productive. Using Spaces to organize the workspace sort of helps, but nothing beats a big screen. I've gotten used to the Mini keyboard, but I still prefer the Apple external USB keyboard when I 'm working. I installed Melkort's touch pad drivers, but the gestures are not the same; i.e. one finger scrolling on the mini vs 2 two finger scrolling on the MBP. The keyboard and external monitor are really helpful, but I can work without any of these things, if need be.
- Sleep: Sleep used to work flawlessly, now it can be a crap shoot. Sometime after the 10.5.7 update sleep started acting up. Not a big enough deal to spend time tracking down a fix though.
- Watching movies: I've tried several versions of VLC and ran through all the fixes in the forums, but it still has halting problems. Also sound is bleh at best, even with headphones or external speakers. Really harshed my nostalgia when watching Space Above and Beyond.
- Monolingual: Using Monolingual to slim down the install proved to be a case of being to clever for my own good. Turns out that I did need some of those printer drivers and superfluous architectures. I spent a couple hours debugging a make file before I realized that I only had an i386 architecture and that I need to remove the other architectures from the make file.
- N270 processor does not support virtualization: This is the biggest thorn in my side with no work around. More often than not, I have to look at stuff on a different OS; so I use Virtual Box (gave up on Parallels) on the MacBook Pro.
I've use the Dell Mini as my primary machine for six months under heavy use. My 15" MacBook Pro is used mostly for running other operating systems and watching movies. Given that the MBP is 6 times more expensive than the Mini in its current configuration, leads me to question the conventional wisdom about buying the most hardware you can afford. I think that this goes to show the OSX performs quite well with modest hardware.
So far, the advantages of portability outweigh the Mini's shortcomings. However, that hasn't stopped me from eyeing the 13" MacBook Pros, which would do everything I need, just not in such a small package.
Friday, May 15, 2009
HowTo: OSX 10.5.7 update on a Dell Mini 9
As my profile states, I make lots of mistakes. I woke up this morning to the OS X 10.5.7 update bouncing perkily on my dock. So sure, why not? WHY NOT? BECAUSE YOU ARE PLAYING WITH FIRE!!
So here's a HowTo for updating your Dell Mini 9 to OS X 10.5.7:
1. Get the stuff you need on your disk. The update will bork/break your screen so you have to boot to safe mode. Another added annoyance is that the USB didn't work for me after the update, so having these files on your drive or on a network share is important. Here's the stuff you need.
- If you are on 10.5.5 or lower, use the combo installer. If you are on 10.5.6, you can use the standalone OS X 10.5.7 updater (don't use the system updater, it crashed on me).
- The DellEFI1.1 file
- The AboutThisMac.pkg to fix the About This Mac screen. This isn't necessary but it makes the install look all nice and tidy
2. The instructions for applying the update came from conq at the mydellmini forum. I'm adding a few extra tips that people (including myself) were stumbling on.
1. Download the installer, don't use Software Update. Install 10.5.7. 2. Let it reboot. 3. At the boot screen press enter (or any key) to get the boot prompt. It should look like this: boot: type -x and hit enter boot: -x OS X will enter Safe Mode. 4. When in Safe Mode run DellEFI. 5. Reinstall the Mini 9 Extensions and remove custom dsdt.aml file. These are the default options for the DellEFI, take the default. 6. Reboot. 7. At the boot screen use the -x to enter Safe Mode again 8. After in Safe Mode run DellEFI. Install custom dsdt.aml file, which is the default option, take the default. 9. RebootOne minor annoyance was that my Bluetooth pairings went awry and I had to pair my devices again. Running monolingual again will help remove some of the bloat of the update as well as cleaning up any programs that you might have installed since the last time monolingual was last run. I had installed Xcode and monolingual removed ~750mb worth of stuff.
That's it. Good luck!
Monday, April 27, 2009
External Displays on the OSX Dell Mini 9
I'm on the second week of using my OSX Mini 9 as my main work computer (work being email, writing, presentations, IRC, browsing, and some light application dev work) and so far the experience has been great, especially while traveling in NYC last week. I'm prepping PowerPoints for presentations this week, so I tried using an external monitor to see them on a larger screen. Using an external monitor or projector turns out to be a little more complicated than on a typical Mac; although my success connecting the MacBook Pro's DVI to SVGA dongle to projectors has been less than stellar in the past.
I plugged my external monitor into the SVGA port and the screen immediately turned to gobbledygook. It turns out that mirroring is turned on automatically by default in the Display Preferences. Apparently the kext loaded by DellEFI1.1 is not display mirroring friendly. Fortunately, this is a solved problem and you can download the mirrorTool utility to turn off mirroring. The tool comes as an app or as a command line utility. First unplug the external monitor to restore the Mini's screen. Using the command line tool was simple:
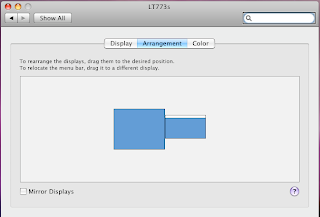
./mirror -offOnce mirroring is off, you should see part of the desktop on the external monitor and the menu bar and dock in your mini screen. From my viewpoint this is backward and I want both the menu bar and dock on the larger screen. When I tried viewing a slideshow using NeoOffice Impress, the Mini screen displayed the slides and the external monitor displayed the presenter preview; obviously this wasn't working out as expected. To switch these around, open System Preferences > Displays find the window with the external monitor and click on Arrangements.
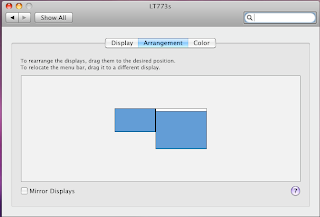
You can drag the menu bar to the external monitor and I dragged the Mini screen to the right of the external monitor.
The menu bar and dock are now where I expect them to be. Moving the menu bar is key to getting Impress to display a slideshow correctly. Your preferences are saved, so when you unplug from the external monitor, the Mini reverts to its previous state.
Finally, adding a USB keyboard and a bluetooth mouse to the equation finishes things up quite nicely.
Thursday, April 16, 2009
HowTo: Install OSX on a Dell Mini 9 with an external DVD
Yes, I know that there a gazillion guides on how to install OS X on a Dell Inspiron Mini 9, but for some reason they were all just a little bit off or outdated or just really complicated and hard to follow. This guide was the most comprehensive, but not the easiest to follow.
This guide is for installing OS X 10.5.6 on a Dell Inspiron 9 with an external DVD drive, no USB drives needed.
Things you need:
- Dell Mini 9 with at least 16GB SSD drive
- External DVD with USB interface
- OS X 10.5.6 Retail version
- DellMiniBoot v8.02b1 iso
Installation:
- Download the the DellMiniBoot iso and burn it to a bootable CD.
- Connect the external DVD to the Dell Mini and turn on the Mini. Press "0" to enable the boot menu, choose CD/DVD to boot to the DVD drive.
- The system will load a linux kernel and return with a prompt that says "boot:" At this point, remove the boot disk and put the OS X disk in the DVD drive.
- Press ESC to bring up the drive options, type in "9f" then enter to select the dvd drive. At this point, my install returned an "ebios read error". This means that drive is having problems reading the disk. The solution is to turn of the external drive and turn it on again while the Mini is still running. Plugging and unplugging the USB cable is also supposed to work. There will be a couple more "ebios read errors" then the drive should catch and start to load the OS X installer.
- The installer will ask to partition and reformat your SSD drive, it should do this automatically. However, in my case I installed a third party 32gb Runcore SSD* so I had to manually partition the disk using the disk utility that comes with the installer. I partitioned the drive as a Mac OS Extended (journaled), pressed "Options..." selected GUID and pressed "Apply". I then returned to the install, which took about 45 minutes.
- When OS X is installed and running, replace the OS X disk with the DellMiniBoot cd. Open the CD in Finder and open the DellMini9Utils directory. Click on the DellEFI app, this will install the boot loader and other extensions such as the WiFi driver.
- In the same directory, click on the AboutThisMac.pkg package to update the system information.
- Restart the Mini 9, and it should boot to OS X with wifi, sound, bluetooth and the other goodies enabled.
- Other things I did was upgrade the system memory from 512mb to 1gb, added a 16gb SDHC for extra storage, added a bluetooth dongle I had lying around.
- Enjoy typing on a ridiculously small keyboard!
* I installed a Runcore SSD because it currently has the fastest read/write speeds for a MLC (Multi-Level Cell) SSD card. My brother-in-law installed a Crucial SSD and the system was unusably slow. I ordered my SSD from MyDigitalDiscount and it took over a month for them to ship the SSD because demand is far outstripping supply. That being said, it was definitely worth the wait because the OS X boot time about 15-20 seconds and everything runs quite quickly.
So totaling up the costs (including shipping and taxes):
$170.00 Dell Inspiron Mini 9 (refurbished) $124.00 Runcore 32gb SSD $137.00 OS X 10.5.6 Retail $ 30.00 16gb SDHC----------$461.00
A bit more than the often touted $300 netbook, but I'm willing to pay the extra premium for an OS that enhances my productivity.
Subscribe to:
Posts (Atom)
