Tuesday, June 9, 2009

Why I use Twitter

Actually, I don't twitter much, mostly I follow twitters. I use twitter as way to find new information and discover intersections.  Twitter succeeds where RSS feeds fail and leave me cold, which is to say that Twitter can provide vetted information from people with similarly aligned interests.
Today's example is from @zoecello.  I follow her because I love her music, she presents an interesting intersection between information technology and music and last but not least, she's left IT to be a professional musician, which is something I aspire to one day.   This tweet is exemplary of the type of serendipity that I find using twitter:
@zoecello: Today's task: make a demo piece of music for Robert Hodgin (http://www.flight404.com) to work with
The name and the website sounded faintly familiar, so I followed the link to flight404.   The site is the blog of Robert Hodgin who is doing very cool visualization stuff with Processing.  Even better was a nugget about Processing code to read and render SRTM .hgt elevation files.  This site is the portfolio of Kyle McDonald who also had some neat structured light examples.  I really haven't had this type of productive linkage in quite a while.  

Tuesday, June 2, 2009

So long, farewell, auf Wiedersehen, good night Dell Mini 9

Dell has pulled the plug on the Dell Inspiron Mini 9 and officially retired it.  Until the Mini 9, I was never a fan of Dell's products, but now a 9 month production run just seems too short.  The Mini 9 has been removed from the Dell store and there were only 7 left at the online Dell Outlet store last I checked and they are going fast.  Its replacement is the Mini 10v; which, by early accounts, is another good platform for OS X and general modding.  
The Mini 9 has been the darling of the house since I used it (while waiting my turn at a the San Jose airport car rental building) to register as a car rental club member while in a very long line.  I was able to jump into the "members only" line immediately and get out of there quickly.  Yay! for ubiquitous internet access (the OS X tethering to a Blackberry works flawlessly).
Anyway there have been strong hints that other members of the house want a Dell Mini to replace aging MacBook Pros, so stay tuned for posts on the 10v.  By the way, are you listening Apple? Let me repeat that, "Dell Mini to replace aging MacBook Pros."

Sunday, May 31, 2009

Ranty, rant, rant: There ought to be a law ...

Correct if I'm wrong, but we are near the end of the first decade of the 21st century, right?  We've had more than a decade of federal initiatives to make geospatial data more available and interoperable.  Then why do I get handed a largish data set (4 to 7GB depending on the format) produced by a federal agency in a proprietary format that requires me to have a license to ESRI products?  
My task is to move this data set into PostgreSQL/PostGIS, but since I don't have the necessary SDE libraries on the system, I can't even compile ogr2ogr to accomplish this.  This really is a vendor problem, specifically an ESRI problem.  If I was handed a Oracle export file, I can easily move this data by compiling ogr2ogr because Oracle provides the necessary libraries in its client SDK, which is available by download.  
Ironically, the purpose of this exercise to make this data more easily available.  However, I can't make it past first base because I'm hamstrung by the data format.  This is such a 90's problem.  Although shape files are the defacto lingua franca for geospatial data, the format has its limitations, namely a 2GB limit for dbf files.  It was unusual for a data set to be larger than 1GB in the 90's; but 20 years later, data sets over 2GB are not uncommon.  The current Federal procurement language should be amended to mandate that geospatial software produce entire data sets that are in an open and accessible format.

Monday, May 25, 2009

Paleogeography vs Neogeography

This was a common topic of discussion at Where2.0.  During my monthly email box clean out, I noticed that my GIS-L listserv mail was practically non-existent.  So I compared it to the Geowanking email list traffic. Here are the results:
Number of posts at GIS-L is definitely trending downward in comparison to the number of posts at Geowanking.  Before doing this analysis, I did a quick check of the archives and twittered this:
@spara: #wherecamp GIS is dying.  May listserv stats - gis-l: 2 messages vs geowanking: 99 messages
Dave Smith replied:
@DruidSmith: @spara GIS-L isn't the only trad. GIS listserv out there, ESRI-L, ARCVIEW-L, NEARC-L and others exist and have good traffic.
@DruidSmith: @spara Not to mention may other platform-specific ones, like GeoServer, GeoWebCache, Google Maps listservs...
All good points, but I compared GIS-L against Geowanking because they are the predominant generic geospatially oriented email lists.  Other email lists are focused on a specific vendor or software, so  I thought comparing GIS-L to Geowanking was a more apples to apples comparison.
The data is here if you want to do more analysis, and if you want to gather the data on other email lists, below is a one line bash script to harvest the number of messages per month from a Mailman list archive:
while read line; do url="http://geowanking.org/pipermail/geowanking_geowanking.org/$line/thread.html"; /sw/bin/wget -q -O- $url | grep 'Messages:'  | awk '/<b>Messages:<\/b>/ {printf $2}' | awk '{sub(/<p>/,"\r");print}';done < dates.txt > geowanking.txt
To run this: 
  1. replace the url to the url list archive of choice, note that the date is held in the $line variable
  2. create a text file call dates.txt with the year and month formated as year-month (2009-May) with only a single year-month entry per line for the time period you want to compare
  3. redirect the output for to the file of your choice ( > myoutput.txt)
It would interesting to see a comparison of email list traffic between open source and proprietary geospatial software. 

Friday, May 15, 2009

HowTo: OSX 10.5.7 update on a Dell Mini 9

As my profile states, I make lots of mistakes.  I woke up this morning  to the OS X 10.5.7 update bouncing perkily on my dock.  So sure, why not? WHY NOT? BECAUSE YOU ARE PLAYING WITH FIRE!!
So here's  a HowTo for updating your Dell Mini 9 to OS X 10.5.7:
1. Get the stuff you need on your disk.  The update will bork/break your screen so you have to boot to safe mode.  Another added annoyance is that the USB didn't work for me after the update, so having these files on your drive or on a network share is important.  Here's the stuff you need.
  • If you are on 10.5.5 or lower, use the combo installer.  If you are on 10.5.6, you can use the standalone OS X 10.5.7 updater (don't use the system updater, it crashed on me).
  • The DellEFI1.1 file
  • The AboutThisMac.pkg to fix the About This Mac screen.  This isn't necessary but it makes the install look all nice and tidy
2. The instructions for applying the update came from conq at the mydellmini forum.  I'm adding a few extra tips that people (including myself) were stumbling on.
1. Download the installer, don't use Software Update. Install 10.5.7. 2. Let it reboot.  3. At the boot screen press enter (or any key) to get the  boot prompt.  It should look like this: boot:     type -x and hit enter boot: -x     OS X will enter Safe Mode.  4. When in Safe Mode run DellEFI. 5. Reinstall the Mini 9 Extensions and remove custom dsdt.aml file.  These are the default options  for the DellEFI, take the default. 6. Reboot.  7. At the boot screen use the -x to enter Safe Mode again 8. After in Safe Mode run DellEFI.  Install custom dsdt.aml file, which is the default option, take the default. 9. Reboot
One minor annoyance was that my Bluetooth pairings went awry and I had to pair my devices again. Running monolingual again will help remove some of the bloat of the update as well as cleaning up any programs that you might have installed since the last time monolingual was last run.  I had installed Xcode and monolingual removed ~750mb worth of stuff.
That's it.  Good luck!

Wednesday, May 13, 2009

Off to Where2.0 and Wherecamp

I'll be at Where2.0 next week helping out with the GeoServer, GeoWebCache + OpenLayers: The OpenGeo Stack Workshop and the Spatial Database Tips and Tricks Workshop.  Both workshops offer lots of detail and examples, exactly the kind of workshops that I like.  The workshop materials will be available on opengeo.org after Where.  We'll also make a few OpenGeo announcements at Where2.0.
I'll also be at Wherecamp following Where2.0.  This year's Wherecamp is a bit shorter and only partly on a weekend because of requests not to cut into the Memorial Day weekend.  Sadly, there will be no camping this year, but Wherecamp will be held at Social Text, where the very first barcamp was held.  I'm looking forward to seeing old friends and what people are working on!

Monday, April 27, 2009

External Displays on the OSX Dell Mini 9

I'm on the second week of  using my OSX Mini 9 as my main work computer (work being email, writing, presentations, IRC, browsing, and some light application dev work) and so far the experience has been great, especially while traveling in NYC last week.  I'm prepping PowerPoints for presentations this week, so I tried using an external monitor to see them on a larger screen.  Using an external monitor or projector turns out to be a little more complicated than on a typical Mac; although my success connecting the MacBook Pro's DVI to SVGA dongle to projectors has been less than stellar in the past.
I plugged my external monitor into the SVGA port and the screen immediately turned to gobbledygook.  It turns out that mirroring is turned on automatically by default in the Display Preferences.  Apparently the kext loaded by DellEFI1.1 is not display mirroring friendly. Fortunately, this is a solved problem and you can download  the mirrorTool utility to turn off mirroring.  The tool comes as an app or as a command line utility.  First unplug the external monitor to restore the Mini's screen.  Using the command line tool was simple:
./mirror -off
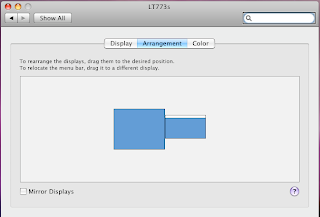
Once mirroring is off, you should see part of the desktop on the external monitor and the menu bar and dock in your mini screen.  From my viewpoint this is backward and I want both the menu bar and dock on the larger screen.  When I tried viewing a slideshow using NeoOffice Impress, the Mini screen displayed the slides and the external monitor displayed the presenter preview;  obviously this wasn't working out as expected.  To switch these around, open System Preferences > Displays  find the window with the external monitor and click on Arrangements.
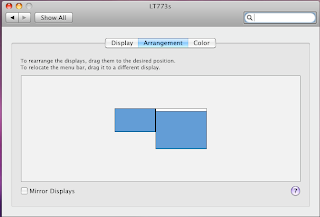
You can drag the menu bar to the external monitor and I dragged the Mini screen to the right of the external monitor.
The menu bar and dock are now where I expect them to be.  Moving the menu bar is key to getting Impress to display a slideshow correctly.  Your preferences are saved, so when you unplug from the external monitor, the Mini reverts to its previous state.
Finally, adding a USB keyboard and a bluetooth mouse to the equation finishes things up quite nicely. 

Thursday, April 16, 2009

HowTo: Install OSX on a Dell Mini 9 with an external DVD

Yes, I know that there a gazillion guides on how to install OS X on a Dell Inspiron Mini 9, but for some reason they were all just a little bit off or outdated or just really complicated and hard to follow.  This guide was the most comprehensive, but not the easiest to follow.
This guide is for installing OS X 10.5.6 on a Dell Inspiron 9 with an external DVD drive, no USB drives needed.
Things you need:
  • Dell Mini 9 with at least 16GB SSD drive
  • External DVD with USB interface 
  • OS X 10.5.6 Retail version
  • DellMiniBoot v8.02b1 iso
Installation:
  1. Download the the DellMiniBoot iso and burn it to a bootable CD.
  2. Connect the external DVD to the Dell Mini and turn on the Mini.  Press "0" to enable the boot menu, choose CD/DVD to boot to the DVD drive.
  3. The system will load a linux kernel and return with a prompt that says "boot:"   At this point, remove the boot disk and put the OS X disk in the DVD drive.
  4. Press ESC to bring up the drive options, type in "9f" then enter to select the dvd drive.  At this point, my install returned an "ebios read error".  This means that drive is having problems reading the disk.  The solution is to turn of the external drive and turn it on again while the Mini is still running.  Plugging and unplugging the USB cable is also supposed to work.  There will be a couple more "ebios read errors" then the drive should catch and start to load the OS X installer.
  5. The installer will ask to partition and reformat your SSD drive, it should do this automatically.  However, in my case I installed a third party 32gb Runcore SSD* so I had to  manually partition the disk using the disk utility that comes with the installer.  I partitioned the drive as a Mac OS Extended (journaled), pressed "Options..." selected GUID and pressed "Apply".  I then returned to the install, which took about 45 minutes.
  6. When OS X is installed and running, replace the OS X disk with the DellMiniBoot cd.  Open the CD in Finder and open the DellMini9Utils directory.  Click on the DellEFI app, this will install the boot loader and other extensions such as the WiFi driver.
  7. In the same directory, click on the AboutThisMac.pkg package to update the system information.
  8. Restart the Mini 9, and it should boot to OS X with wifi, sound, bluetooth and the other goodies enabled.
  9. Other things I did was upgrade the system memory  from 512mb to 1gb, added a 16gb SDHC for extra storage, added a bluetooth dongle I had lying around.
  10. Enjoy typing on a ridiculously small keyboard!
* I installed a Runcore SSD because it currently has the fastest read/write speeds for a MLC (Multi-Level Cell)  SSD card.  My brother-in-law installed a Crucial SSD and the system was unusably slow.  I ordered my SSD from MyDigitalDiscount and it took over a month for them to ship the SSD because demand is far outstripping supply.  That being said, it was definitely worth the wait because the OS X boot time about 15-20 seconds and everything runs quite quickly.
So totaling up the costs (including shipping and taxes):
$170.00  Dell Inspiron Mini 9 (refurbished)   $124.00  Runcore 32gb SSD                                $137.00  OS X 10.5.6 Retail                                 $ 30.00   16gb SDHC                                             
----------
$461.00
A bit more than the often touted $300 netbook, but I'm willing to pay the extra premium for an OS that enhances my productivity.

Wednesday, April 15, 2009

Maps for Advocacy

From the WhereIdeas Wiki:
Tactical Technology Collective has put together a great book Maps for Advocacy: An Introduction to Geographical Mapping Techniques (http://www.tacticaltech.org/mapsforadvocacy). Use of maps in the political and activism space is growing and very successful. —GregElin, Sunlight Foundation.
Summary blurb from the Tactical Technology Collective website:
"The booklet is an effective guide to using maps in advocacy. The mapping process for advocacy is explained vividly through case studies, descriptions of procedures and methods, a review of data sources as well as a glossary of mapping terminology. Scattered through the booklet are links to websites which afford a glance at a few prolific mapping efforts. "
Indeed, in 44 pages the booklet provides coverage of the majority of the web based mapping technologies available today that don't require purchasing a license.  One of the best parts of the book is the roadmap to the technologies based upon what a user wants to do. 
If you provide a service or software, where do you think your technology fits?

Tuesday, April 7, 2009

Communities

A question about directional arrows came up on the udig developers list:
"How to style line features with an arrowhead at either end? Preferably using SLD, other methods are welcome if SLD does not support that. I found this thread on the subject: http://www.nabble.com/Directional-Symbology-td12231197.html ...but it does fully answer the question. Given a line feature type with a LineSymbolizer, if I define an additional PointSymbolizer for that type, where do the point symbols get placed? At the first vertex, the last, somewhere in the middle of the line? Do I have to create an additional point feature just to position the arrow icon on a line feature?"
So I pointed him to a geoserver blog post on that very topic and the poster was able to implement a solution quickly.
Communities are awesome.  How's that for tech support?